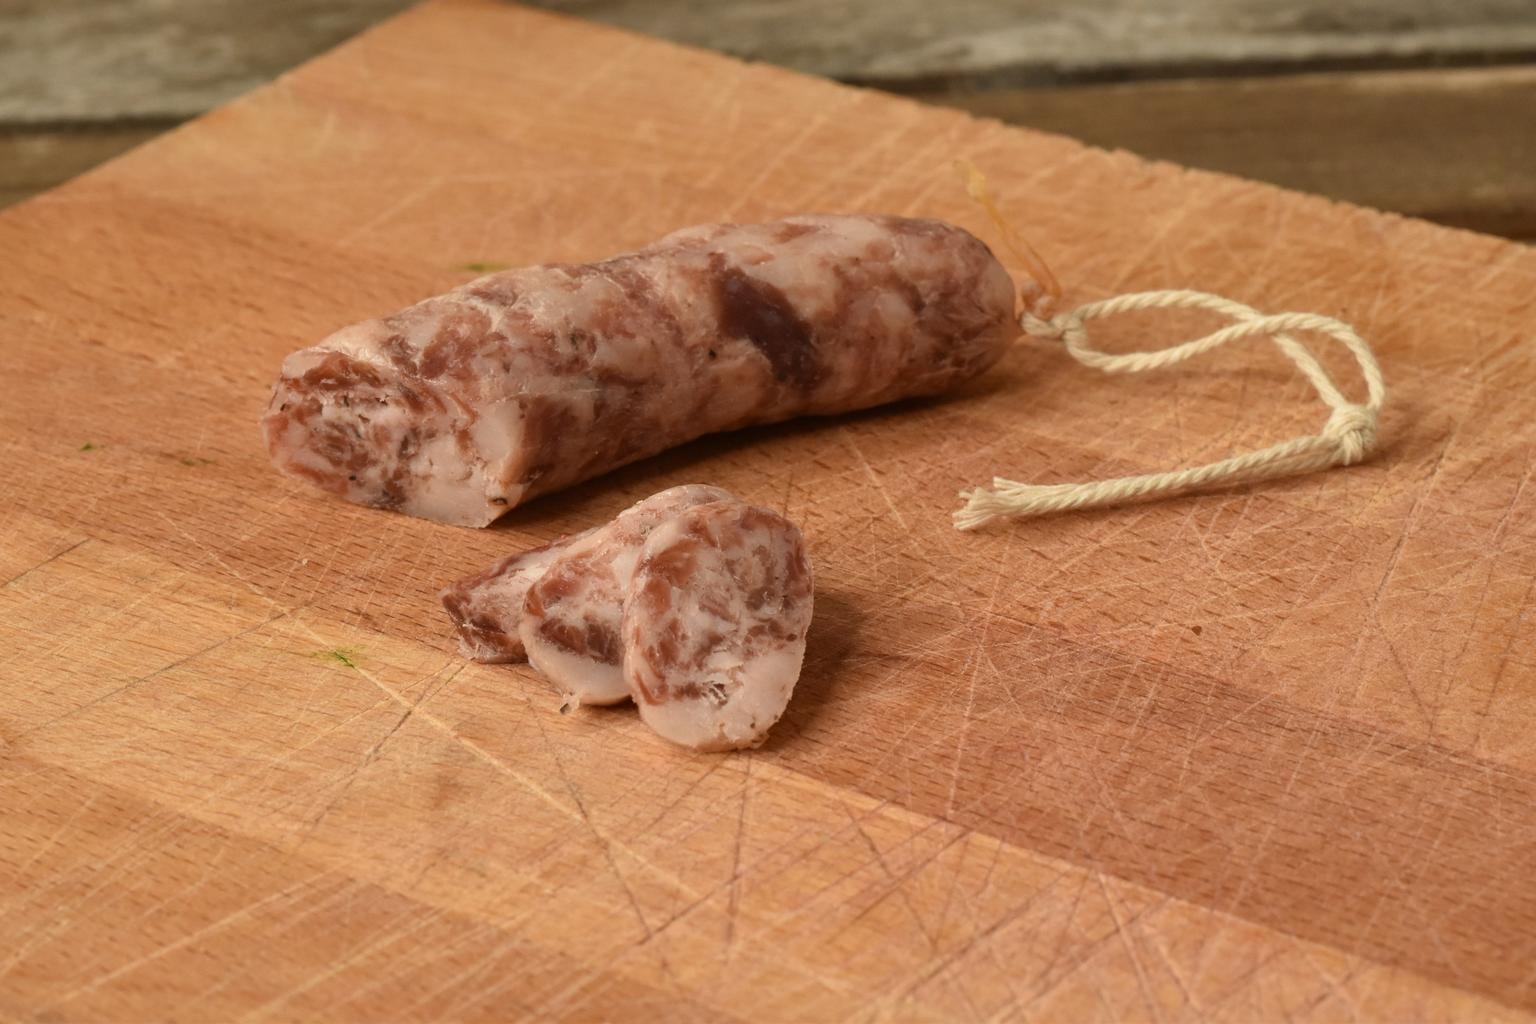
My first try on making salami. I played around with meat types and ended up with a way too high fat content as one can easily see by the color of the final product. The taste was amazing, though the consistency was too soft.
Ingredients
- 330g pork ‘Bauchfleisch’ (belly meat)
- 330g pork ‘Göderl’ (super fatty part around the chin)
- 330g beef ‘Suppenfleisch’ (soup meat)
- 30g curing salt
- 3g sugar
- 2g black pepper
Note: Most recipes use less salt (around 2.5%) however, to be on the save side, I decided to go with 3% for the first batch.
In addition I was not sure which meat to buy. The salami ended up being quite fat. Next time Maybe dont buy belly meat. Compared to the ‘Göderl’ the meat was really hard. Try to substitute this with some nice low fat pork instead.
On the left you can see the three used cuts (pork belly meat, pork’Göderl', beef soup meat)

Instructions
Start by mincing the meat. I choose to mince it pretty coarse. Weight the other ingredients and mix them in. To increase chances of success I increased the salt percentage. After preparing the sausage casing of your choice (I used pork colon for this batch as the artificial casing did not arrive in time) based on the instructions of the product, start to fill them.
One thing I noticed that it was pretty easy as long as the casing was pretty wet. The moment it started drying on the sausage maker it got harder and harder. Rehydrating it with a wet hand once in a while did the trick.
For me filling two at a time and stringing them up together is the easiest and best way of handling it. It makes hanging them super easy and saves a lot of space than doing single ones. I would also recommend to knot the ends with the casings. It just holds better and I never had issues hanging them afterward.
While the drying process for salami usually is a pretty defined schedule I choose to let them hang in the fridge the whole time. Thats not the best way (usually you want higher humidity in the beginning and overall warmer temperatures) but it felt saver (6 degrees and humidity between 70-80% at the start of the process). After a while humidity decreased a bit as I removed a finished batch of cured meat. Though that was not an issue overall. If you need to increase the hydration, just place a plate with water under the sausages.
As with curing meat I noticed that the top of the sausages dried way faster than the downer end. There for I inverted the hanging position after 5 days.
At day 7 I tried one sausage. It was much to soft to be sliced normally, but tasted pretty amazing.
After 15 days I cut the second sausage. It was noticeable more firm, though still too soft for salami. I’m pretty sure this is due to the high fat percentage. The sausage in question also did not loose much weight the last few days so I think it won’t get much harder than that for the next ones either.
Tips:
- making nods with the colon itself makes it easier to hang them afterward. I had some of the string gotten loose after a few hours hanging.
- The whole process is not worth it if you make sausage from less than 1kg meat. Cleaning the stuff took nearly as long as the rest of the process. So rather make bigger batches. Vacuumed salami should hold up months in the refrigerator and freezing should also be possible.
Next time:
- reduce the fat by a lot. don’t use pork belly but substitute it with some fatless meat.
- drying in the attic worked noticeable faster. Maybe try a pair to try there from the start next time.
Some weight data
As all sausages are basically the same thickness I only weighted two of them to get an estimate how long drying will take.
2022-03-19:
- 126g (left front) target: 83g
- 115g (3 days in)
- 112g (4 days in)
- inverted hanging position (day 5)
- 107,5g (6 days in)
- 105g (7 days in)
- 100g (9 days in)
- 98g (11 days in)
- 95,5g (12 days in) comparison start date
- 92,5g (15 days in)
- 90g (17 days in)
- 87,8 (21 days in)
- 76g (right front) target: 50g
- 66g (2 days in)
- 62g (3 days in)
- 60g (4 days in)
- inverted hanging position (day 5)
- 56,5g (6 days in)
- 55,5g (7 days in)
- 53g (9 days in)
- 52g (11 days in)
- 50g (12 days in)
- 49g (15 days in)
After 11 days in the fridge I decided to hang one pair of sausages in the attic to dry. As comparison to 126g (left front) in the fridge. Average temperatures were below 10 degrees there, though the humidity was way lower (TODO).
2022-03-30:
- WRONG measured (attic start) (11 days in fridge before)
- 94g (1 day in attic) comparison start date
- 89g (4 days in attic)
- 86g (6 days in attic)
- 83,3g (10 days in attic)