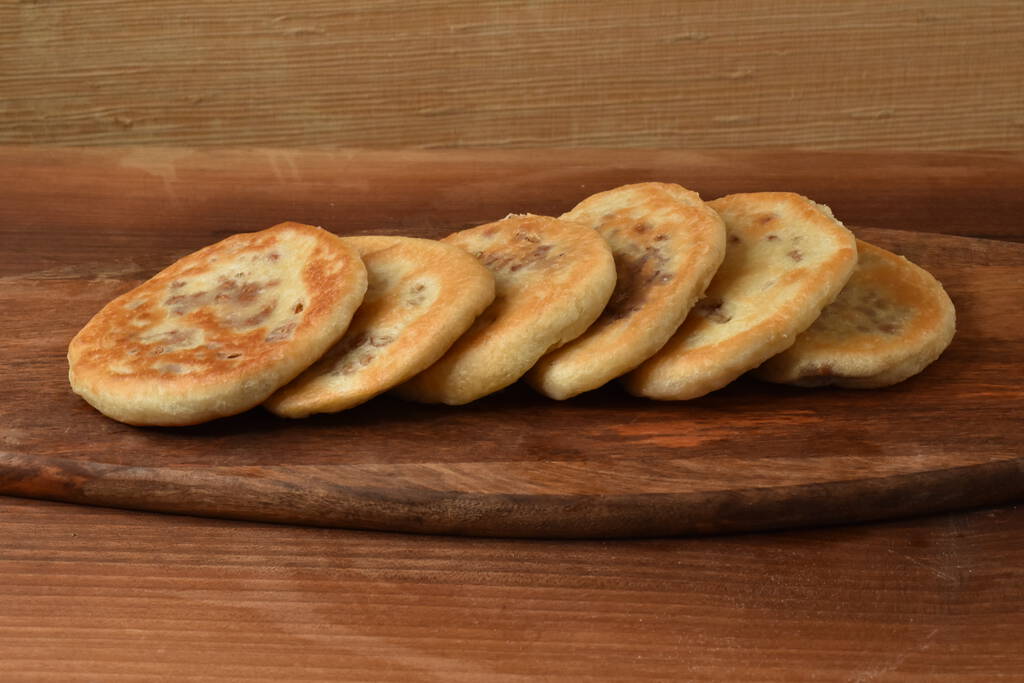
Hotteok is an amazing korean street food best described as baked cinnamon buns with nuts. The filling process is kind of tedious but you get the hang of it after the first few. And it so worth the hassle!
Ingredients
Dough
- 330g all purpose flour
- 250g warm water
- 35g melted butter
- 30g sugar
- 1pkg dry yeast
- 6g salt
Filling
-
40g almonds
-
40g walnuts
-
40g sugar
-
40g butter
-
3.5g cinnamon
-
10g flour
-
30g butter
Instructions
Dough
I usually never use dry yeast if I have fresh ones at hand. However, as literally all Hotteok recipes I read use instant yeast I thought I give it a dry. Maybe its the better choice because one does press the dough flat during baking, maybe its just instant yeast because its easier to use for street food.
For the dough you can mix soe of the flour, the sugar some warm water and the dry yeast together and let it sit for 20 minutes in a warm place. This activates the yeast. Afterward knead all other ingredients together and let the dough rest covered for 30-60 minutes in a warm place.
Note: if you let the dough rise for too long you will notice it in taste. Warm water and a lot of yeast for quite little flour will over ferment in no time. The dough should double in size. Not more.
Filling
There are two ways you can go about the filling. You skip the butter, chop the nuts roughly and mix all ingredients. This woks and tastes fine, though it is quite hard to use this filling later on.
The alternative is to blend half of the nuts as well as the sugar and butter together first. Then chop the rest of the nuts and mix all ingredients together. This way you can form little balls up front for your filling and it is much easier during the filling process. There is one downside however. If you use butter here and your hotteok rips open during baking the butter will rin out and you will have to use fresh oil after this batch.
Filling Process
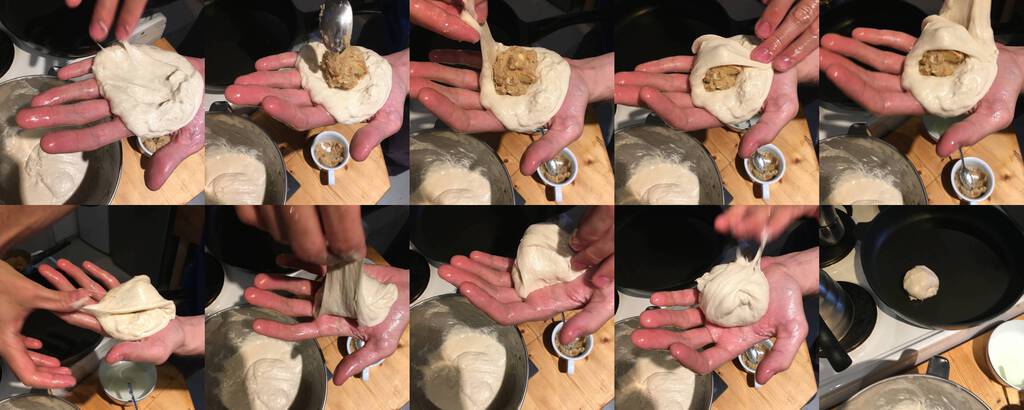
Before starting filling, preheat the pan with some neutral tasting oil. Get a small vessel with some extra oil in place. You are going to need this for your hands during filling. The dough is very wet and a pain to handle otherwise.
To get similar sized hotteoks I would suggest to place the bowl with the dough on a scale and zero it. This way you can see how much you actually remove. I found that 100g dough was pretty easy to fill with 1tbsp of filling. However, I liked the end result with 80g dough and 1tbsp filling better. Maybe start with more dough and work your way down.
Before touching the dough, cover your hand with oil, not only the palms, but also your fingers in their entirety (font and back!). And yeah, I’m aware that oily hands do not make appetizing pictures though it makes explaining the process easier.
Get some dough out onto your hand and try to flatten it. In the end it felt like trying to spread it to make enough space so the filling could stay in place in the middle. If possible the filling should stay on top of the dough. Grab one side of the dough and pull it over the filling. Repeat the progress until the filling is fully covered. Try to round the dough ball if possible, though don’t bother about this too much. Rather ensure the dough does not rip and expose the filling.
Place the formed dough ball with the side you closed downwards in the pan.
Let them fry at medium heat until the downside gets very lightly golden. Now flip them over and press them flat. I used a thermos, but you can use pretty much everything you want to do so. Do press down until you start feel more resistance. The dough should spill out on all sides, forming a nice ring. This is the step that feels very weird to me as this will reduce the fluffiness of the dough. That did hold true, though the outer ring of the dough did stay super fluffy, while the inner part was super crispy and tasty due to the filling.
Now let the downside fry until nice golden brown. Turn the dough one more time and finish frying the other side until its also nice and golden.
Hotteok does taste best fresh out of the pan. Cold it does loose a lot of texture. Do not serve it that way. You can however freeze them once they fully cooled down. Preheat a oven to 200 degrees and place the frozen hotteok directly from the freezer onto a baking tray. Bake it for 10 minutes. Flipping it after 6 minutes will make both sides crispy.
Note in regards to baking time and chosen heat: I started with low medium heat (2) which took about 15-20 minutes to bake the first batch. I tried to go higher with the heat (3 and even 4). At 4 it took about 10 minutes to bake. It was ok though shorter would be problematic as the sugar does not have time to fully melt. The crust was also better at medium to medium high heat. Play around which does fit you best and aim for 10-12 minutes of baking time. Note however that the dough does need time to bake. Don’t reduce the baking time below 10 minutes!
Tips
- Cover your hands very well with oil
- Do not let the dough rest for too long. Due to the high amount of yeast you have to be careful to not over do it.
- Use a big pan. Mine was too small and the hotteoks did not have very nice forms other than the last one
Next Time…
This should also taste incredible filled with chocolate, hazelnut cream or with an apple cinnamon mix. Try some other variations just for the fun of it.
This would also be amazing with a bit less sugar in the dough but filled with sauerkraut and bacon. see salty hotteok recipe.
The sugar and nut mix was a bit tricky to use. Sometimes I got way more nuts, others got mostly sugar.
For easier filling one could try to blend half of the nuts to bind the sugar better.
This also might allow to preform little filling balls that would ease the forming a lot. Altered recipe.
