
Bread shaping is an important step between bulk fermentation and proofing when baking sourdough bread. It was one, if not the most neglected step in bread baking on mine for nearly a decade. Though shaping your bread correctly can really up your game if done right.
First things first. You do not shape your sourdough dough to give the loaf the form that you want it to have. You shape it, so the loaf will hold its form during proofing. Shaping will also define its perfect form during baking.
Ever had the problem that a perfectly formed loaf does spread out to become flat bread before baking? Did your loaf rip open during baking on various spots instead of the score you cut before?
To tell the truth, both problems can have various sources and shaping might not be the most important thing if you are totally new to sourdough bread. But it is a very important step once you got the basics and want to step up your game.
Why Shaping
A important lesson that I did not get for a long time was that shaping is not about getting the dough in form, but rather building up good tension on the outside, so it will keep its form later on. To be able to build up tension, your dough has to be done correctly of course. Without good gluten structure, you simply cannot build tension. For me however gluten development never was a problem. 30 to 60 minute autolyze does wonders, even when mixing the dough with a machine (without slap and folds or similar procedures). Where I failed was using this structure for my advantage to build up tension on the outside, to create a skin like layer over the whole loaf.
When done right, this layer will keep the loaf in shape during proofing. This layer will trap will allow for great oven rise and perfect scores or a great ear during baking.
Instructions
There are various methods on how to form bread loafs out there and searching on YouTube will give you more options than I could describe here. I want to show two methods that I most often use. The first one is quite easy to manage the one I use most often on yeast based bread or sometimes on low hydration sourdough bread. If you are new to shaping I would suggest using this method the first few times, potentially with a lower hydration as you do normally (60-65 percent hydration).
The second method is more advanced and is the one I mostly use for sourdough bread. It splits shaping into two steps and yields amazing results.
Easy Method
Get your dough out of the bulk fermentation container on a slightly floured surface. If possible try to get the dough out upside down, so the not so sticky side is on your surface.
Grab one side of it and pull it over the middle. Gently press down. From now on, always grab the next end of the edge and repeat the process until you get a decent shape:

Now, turn the loaf around. It can help to reduce the flour on the table for this step as it will help to close the bottom side. Take your bench scraper and bring it under the loaf, roughly to the middle of it. Now start to rotate it so you end up on the other side of the loaf as shown below.

Repeat this process a few times until you see the upper surface tensing, though note that you can overdo this process. The skin will rip and you have to start over.

This step will build up tension on the surface. You can redo it a few times, however do not overdo it, otherwise you will rip it open (most likely revealing air pockets that have been build up during fermentation).
If you use a proofing basket, bring your bench scraper fully under the loaf, lift it and put it in the loaf upside down. If you do not use a basket, place the loaf on sheet of baking paper to proof. In case you do not use a proofing basket you can redo the shaping a second time after roughly 30 minutes. Just be careful to not overdo it with the flour, otherwise you will lower the hydration level too much during shaping.
Advanced Method
This method is great for all kinds of sourdough bread. While this method looks basically the same as the easy one, there are a few key differences to be considered.
First of all, you need a bench scraper. Metal, preferred as it makes it way easier than a plastic one. Second you do the shaping on a non floured surface.
For this method it can help to do pre shape the loaf and let it rest for 20-30 minutes before doing the final shaping. Pre shaping is the very same procedure as shaping.
Shaping
For this shaping method you will use a non floured surface and a metal bench scraper.
Start by forming a semi round dough ball with the bench scraper like that:

Once you got that done, get the bench scraper below your dough and pull it towards you.
Use your slightly floured hand to hold the dough when you pull out the scraper and use it to rotate the dough about 90 degrees before starting to pull it towards you again.

Repeat this step a few times.

And a few times more.

Proofing
No Proofing Basket
Once your loaf developed a good skin you can either let it rest for 20-30 minutes and shape it once more. This will develop an even better skin and is very helpful if you do not use a proofing basket.
Round Proofing Basket
If you do use a round proofing basket, get the bench scraper below your dough and flip it upside down into the proofing basket.

You can stitch the dough, so it holds the form a bit better.
Long Proofing Basket
If you are shaping a long loaf, you have to ad a final shaping step.
Final shaping for long loafs is done on a slightly floured surface. How much flour you need depends a bit on the flour type as well as the hydration level and will take a few tries to get it right. Just know that both, too little and too much flour can mess up your result.
Get the pre shaped loaf and put it on the slightly floured surface upside down. With floured (!) hands, form a square by pulling out the edges. Flap one side (left or right) in, at least a bit over the middle. Afterward flap in the other side. Then roll the dough upwards.
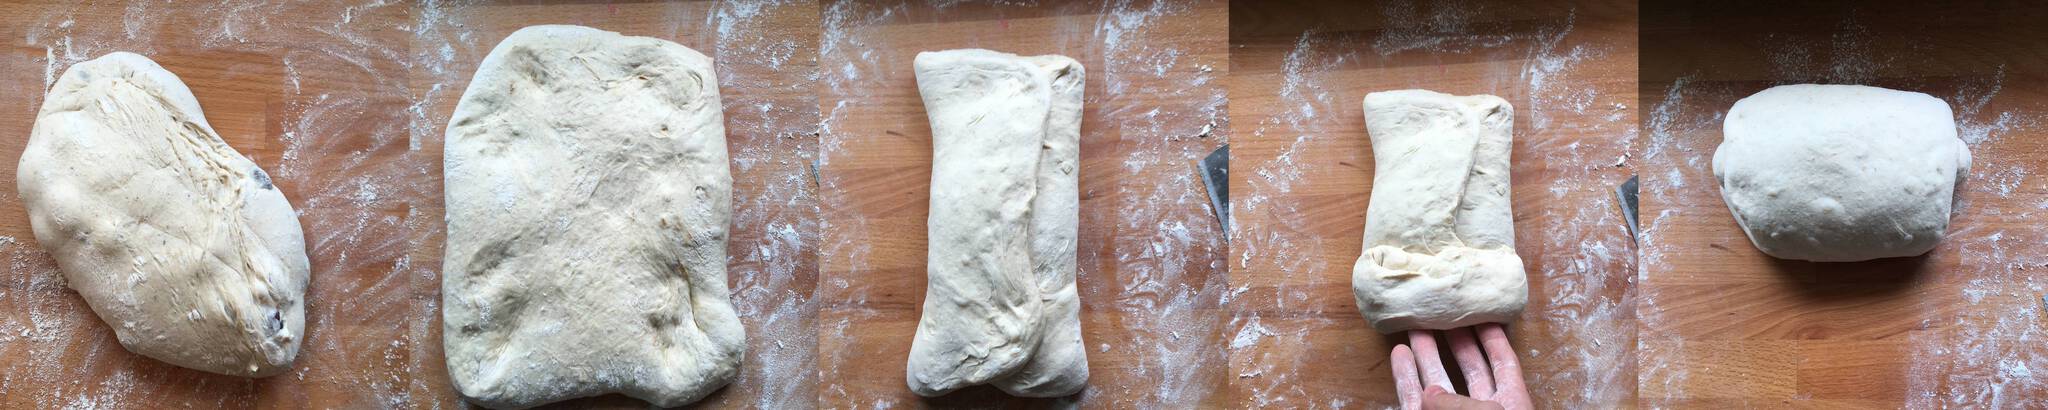
Again, get the bench scraper under the loaf and flip it upside down in a long proofing basket.
Tips
- If you used too little flour and the dough rips open a bit during final shape you can help yourself by redoing the pre shaping steps until you got a semi decent skin again.
- If you used too much flour the damage cannot really be undone. The dough will not close up during pre shaping and will not really hold together during final shape. Note that this does help, but will result in an inferior result than doing it right from the start!
- You can always build up more tension by pre shaping multiple times.
- Use a very low hydration (60%) wheat only sourdough to practice shaping. It is the easiest to handle.